The SSL handshake enables client
and server to establish the secure communication.
A client begins the SSL handshake process by requesting a data using the HTTPS protocol. This initiates by sending a Client
Hello message to the Server.
1. The ClientHello message contains
information about the encryption and compression algorithms supported by the client, as well as a random data and a session ID.
2. The Server responds with a ServerHello message, which also
includes information about supported algorithms and a random data .
3. The Server negotiates the strongest cipher that is supported by both the client and the server. The server also sends its certificate to the client to provide its identity.
4. The server then sends a ServerHelloDone message
indicating that it is finished and awaiting a response from the client.
5. Once the client receives the server's message, it checks the certificate validity against a list of known CA's. The server's certificate contains
its public key and the name of the server, which must match the name of
the server the browser requested. For example, if the user typed the URL
"https://www.google.com" in the browser, the certificate should
contain a subject name of "www.google.com" or
"*.google.com."
6. The client then computes a premaster secret using the two random
values that were generated during the Client and Server Hello.
This premaster secret is encrypted using the public key from the
server's certificate and sent in a ClientKeyExchange message to the
server. If the server can decrypt this data,
the client is assured that the server has the correct private key. A
message encrypted with a public key can only be decrypted by the
matching private key, and visa versa. This step is crucial to proving
the authenticity of the server. Only the server with the private key
that matches the public key in the certificate can decrypt this data and
continue to the protocol negotiation.
7. The SSL handshake process securely exchanges data that is then used by both the client and the
server to calculate a Master Secret key. Because both the server and the
client can calculate the Master Secret key, it does not need to be
exchanged. The server can now respond to the browser with a request to
begin communicating using the established keys and parameters.
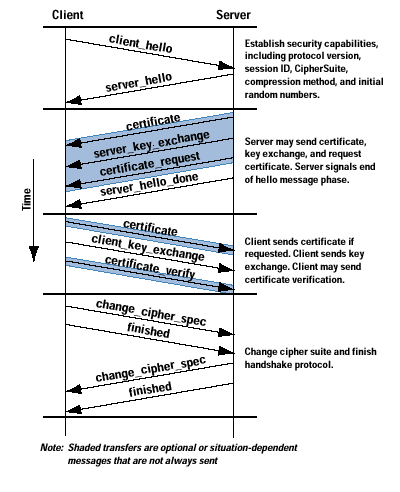
Image Source : https://www.cisco.com/c/dam/en_us/about/ac123/ac147/images/ipj/ipj_1-1/fig2SSL.gif
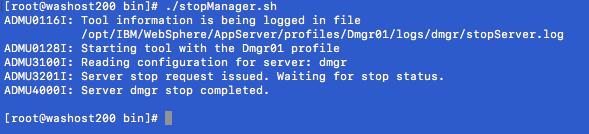
To understand the handshake better, refer the below ssl debug log from WebSphere Application Server. You can enable SSL debug by adding below parameter in the Generic JVM Arguments of a WAS instance.
To understand the handshake better, refer the below ssl debug log from WebSphere Application Server. You can enable SSL debug by adding below parameter in the Generic JVM Arguments of a WAS instance.
-Djavax.net.debug=ssl.handshake
[8/12/17 20:12:38:296 GMT+05:30] 000000e2 SystemOut O *** ClientHello, TLSv1.2
[8/12/17 20:12:38:296 GMT+05:30] 000000e2 SystemOut O RandomCookie: GMT: 498675814 bytes = { 1, 2, 123, 248, 34, 45, 185, 416, 240, 134}
[8/12/17 20:12:38:297 GMT+05:30] 000000e2 SystemOut O Session ID: {89, 143, 1, 141, 126, 174}
[8/12/17 20:12:38:297 GMT+05:30] 000000e2 SystemOut O Cipher Suites: [SSL_ECDHE_ECDSA_WITH_AES_128_GCM_SHA256, SSL_ECDHE_RSA_WITH_AES_128_GCM_SHA256, SSL_ECDHE_ECDSA_WITH_AES_256_CBC_SHA, SSL_ECDHE_ECDSA_WITH_AES_128_CBC_SHA, SSL_ECDHE_RSA_WITH_AES_128_CBC_SHA, SSL_ECDHE_RSA_WITH_AES_256_CBC_SHA, SSL_DHE_RSA_WITH_AES_128_CBC_SHA, SSL_DHE_RSA_WITH_AES_256_CBC_SHA, SSL_RSA_WITH_AES_128_CBC_SHA, SSL_RSA_WITH_AES_256_CBC_SHA, SSL_RSA_WITH_3DES_EDE_CBC_SHA]
[8/12/17 20:12:38:297 GMT+05:30] 000000e2 SystemOut O Compression Methods: { 0 }
[8/12/17 20:12:38:297 GMT+05:30] 000000e2 SystemOut O Extension renegotiation_info, ri_length: 0, ri_connection_data: { null }
[8/12/17 20:12:38:297 GMT+05:30] 000000e2 SystemOut O Extension elliptic_curves, curve names: {secp256r1, secp384r1, secp521r1}
[8/12/17 20:12:38:297 GMT+05:30] 000000e2 SystemOut O Extension ec_point_formats, formats: [uncompressed]
[8/12/17 20:12:38:297 GMT+05:30] 000000e2 SystemOut O Unsupported extension type_35, data:
[8/12/17 20:12:38:297 GMT+05:30] 000000e2 SystemOut O Unsupported extension type_13172, data:
[8/12/17 20:12:38:297 GMT+05:30] 000000e2 SystemOut O Unsupported extension type_16, data: 00:09:08:68:74:74:70:2f:31:2e:31
[8/12/17 20:12:38:297 GMT+05:30] 000000e2 SystemOut O Unsupported extension status_request, data: 01:00:00:00:00
[8/12/17 20:12:38:297 GMT+05:30] 000000e2 SystemOut O Extension signature_algorithms, signature_algorithms: SHA256withRSA, SHA384withRSA, SHA512withRSA, SHA1withRSA, SHA256withECDSA, SHA384withECDSA, SHA512withECDSA, SHA1withECDSA, SHA256withDSA, SHA1withDSA
[8/12/17 20:12:38:297 GMT+05:30] 000000e2 SystemOut O ***
[8/12/17 20:12:38:298 GMT+05:30] 000000e2 SystemOut O %% Initialized: [Session-18, SSL_NULL_WITH_NULL_NULL]
[8/12/17 20:12:38:298 GMT+05:30] 000000e2 SystemOut O ssl: ServerHandshaker.setupPrivateKeyAndChain EC
[8/12/17 20:12:38:299 GMT+05:30] 000000e2 SystemOut O ssl: ServerHandshaker.setupPrivateKeyAndChain, chooseEngineServerAlias null
[8/12/17 20:12:38:299 GMT+05:30] 000000e2 SystemOut O ssl: ServerHandshaker.setupPrivateKeyAndChain RSA
[8/12/17 20:12:38:299 GMT+05:30] 000000e2 SystemOut O ssl: ServerHandshaker.setupPrivateKeyAndChain, chooseEngineServerAlias default
[8/12/17 20:12:38:299 GMT+05:30] 000000e2 SystemOut O ssl: ServerHandshaker.setupPrivateKeyAndChain, return true
[8/12/17 20:12:38:299 GMT+05:30] 000000e2 SystemOut O JsseJCE: Using KeyPairGenerator EC from provider TBD via init
[8/12/17 20:12:38:299 GMT+05:30] 000000e2 SystemOut O JsseJCE: Using SecureRandom IBMSecureRandom from provider IBMJCE version 1.8
[8/12/17 20:12:38:299 GMT+05:30] 000000e2 SystemOut O JsseJCE: Using KeyPairGenerator EC from provider TBD via init
[8/12/17 20:12:38:299 GMT+05:30] 000000e2 SystemOut O ECDHCrypt: ECDH KeyPairGenerator from provider from init IBMJCE version 1.8
[8/12/17 20:12:38:303 GMT+05:30] 000000e2 SystemOut O %% Negotiating: [Session-18, SSL_ECDHE_RSA_WITH_AES_256_CBC_SHA]
[8/12/17 20:12:38:303 GMT+05:30] 000000e2 SystemOut O JsseJCE: Using MessageDigest SHA-256 from provider IBMJCE version 1.8
[8/12/17 20:12:38:303 GMT+05:30] 000000e2 SystemOut O *** ServerHello, TLSv1.2
[8/12/17 20:12:38:303 GMT+05:30] 000000e2 SystemOut O RandomCookie: GMT: 1485771486 bytes = { 82, 108, 179, 199, 69, 164, 237, 120, 98, 184, 190, 241, 0, 56, 38, 38, 87, 114, 118, 249, 10, 31, 38, 25, 199, 193, 34, 219 }
[8/12/17 20:12:38:303 GMT+05:30] 000000e2 SystemOut O Session ID: {89, 143, 19, 222, 218, 207, 227, 25, 244, 111, 125, 16, 74, 180, 244, 57, 245, 116, 106, 124, 235, 179, 133, 92, 219, 214, 5, 115, 230, 100, 178, 151}
[8/12/17 20:12:38:304 GMT+05:30] 000000e2 SystemOut O Cipher Suite: SSL_ECDHE_RSA_WITH_AES_256_CBC_SHA
[8/12/17 20:12:38:304 GMT+05:30] 000000e2 SystemOut O Compression Method: 0
[8/12/17 20:12:38:304 GMT+05:30] 000000e2 SystemOut O Extension renegotiation_info, ri_length: 0, ri_connection_data: { null }
[8/12/17 20:12:38:304 GMT+05:30] 000000e2 SystemOut O Extension ec_point_formats, formats: [uncompressed]
[8/12/17 20:12:38:304 GMT+05:30] 000000e2 SystemOut O ***
[8/12/17 20:12:38:304 GMT+05:30] 000000e2 SystemOut O Cipher suite: SSL_ECDHE_RSA_WITH_AES_256_CBC_SHA
[8/12/17 20:12:38:304 GMT+05:30] 000000e2 SystemOut O *** Certificate chain
[8/12/17 20:12:38:305 GMT+05:30] 000000e2 SystemOut O chain [0] = [
[
Version: V3
Subject: CN=myname.myorg.com, OU=MyOU, O=MyOrg, L=MyLocation, ST=MyState, C=US
Signature Algorithm: SHA256withRSA, OID = 1.2.840.113549.1.1.11
Key: IBMJCE RSA Public Key:
modulus:
21331505602375488717411117866117487842713194144742263680233705067191352083735229283163928558816585982346584375649325694738265983427569348756934875634297856943275692374856392475346537964291464508766115080170773081802577203381027064407312508322291937880612021760110799835688810801641673793995352260398754190907159137142766260211301553939574479958739686607579267532559363842658432658346543956943756943785693247856923875632945762974385629387569432875623450320805862620324765978326598347253425155770974237652083423259440389412582389262738410717703867688125765104935187622487040671737260129756506972278634258743625723469542375231772306367664217087392695584688350243659243567892435673428569324785692347856239475862394587634934726579342
public exponent:
12345
Validity: [From: Fri Jun 30 15:43:41 GMT+05:30 2017,
To: Sun Jun 30 15:43:41 GMT+05:30 2019]
Issuer: CN=MySigner
SerialNumber: [2913846231746921384762391487629134623964855425]
Certificate Extensions: 7
[1]: ObjectId: 2.5.29.31 Criticality=false
CRLDistributionPoints [
1 CRL Distribution Points:
Distribution Point: [
Distribution Point Name: [URIName: ldap:///CN=MySigner,CN=MyIssuer,CN=ABC,CN=Public%20Key%20Services,CN=Services,CN=Configuration, BLAH BLAH?certificateRevocationList?base?objectClass=cRLDistributionPoint]
Reason Flags: null
Issuer: null
]
]
[2]: ObjectId: 1.3.6.1.4.1.311.20.2 Criticality=false
Extension unknown: DER encoded OCTET string =
0000: 12 14 1e 12 11 57 00 65 0045 00 53 00 65 00 73 .....W.e.b.S.e.r
0010: 00 76 00 65 00 72 .v.e.r
[3]: ObjectId: 1.3.6.1.5.5.7.1.1 Criticality=false
AuthorityInfoAccess [
[accessMethod: caIssuers
accessLocation: URIName: ldap:///CN=MySigner,CN=MyIssuer,CN=ABC,CN=Public%20Key%20Services,CN=Services,CN=Configuration, BLAH BLAH?cACertificate?base?objectClass=certificationAuthority
]]
<<Logs truncated for security reasons>>>>>
Algorithm: [SHA256withRSA]
Signature:
0000: 03 62 5f c4 3c 8b 3b 9d 3b 2a e9 1a fb e1 e2 a2 .b…c……4.
0010: d9 63 5c 5f 97 a4 61 5f 5b 03 dd 0a 01 37 37 0a .c….a…….7.
0020: fc e4 79 da 5d 98 d6 ea f1 f9 bb d2 7b 3c 1c 0a ..y.............
0030: 89 6a c4 2a 02 0a 55 3e 49 e4 87 b3 89 a0 7d b7 .j….U……..
0040: 24 03 c1 27 47 90 7a 29 cf a4 3f 23 88 2c cd 35 ….G.z……..5
0050: ad e2 c3 20 c5 e6 36 6b ea 43 44 37 e4 3e d1 20 ......6k.BD7....
0060: e8 e4 09 a5 ac c3 26 b5 a6 81 f2 5f 75 3f f7 05 …………s…
0070: 2c cc 0b 46 11 d1 39 8a 9c 50 49 ff ee 3c 93 3e …F..4..PI.....
0080: 23 b1 0a e5 9f 13 32 3b 1f f5 09 a6 ec d0 c5 17 ……5………
0090: 16 ce 34 64 aa f1 16 66 0c 87 d0 f9 32 e0 f7 ae ..4d…g….2…
00a0: 42 b7 4b 37 03 1c 44 25 1f 4c cf 9a e0 a7 79 aa B.K7..A..M….y.
00b0: d1 38 a9 bd 79 2a 5f 23 b1 80 eb 38 b8 dc aa 77 .8..y......8...w
00c0: df 59 69 c7 1a 14 8f 8e 40 3c a4 a5 35 4c 99 43 .Yi………4L.D
00d0: 92 0d 50 33 4b 51 df d3 0d e4 25 30 b2 64 c2 c3 ..W3KR…..0…e
00e0: ca 17 6c 53 fd 3d 17 15 ef 86 19 18 08 5b 4d b0 ..lS..........M.
00f0: 1d 1e 65 88 03 37 05 ae 4d 70 30 35 af 5d 54 1f ..e..1..Np05..T.
]
[8/12/17 20:12:38:306 GMT+05:30] 000000e2 SystemOut O chain [1] = [
<<Logs truncated for security reasons>>>>>
]
[8/12/17 20:12:38:306 GMT+05:30] 000000e2 SystemOut O ***
[8/12/17 20:12:38:306 GMT+05:30] 000000e2 SystemOut O JsseJCE: Using signature SHA256withRSA from provider TBD via init
[8/12/17 20:12:38:306 GMT+05:30] 000000e2 SystemOut O Signatures: Using signature RSA from provider from initSignIBMJCE version 1.8
[8/12/17 20:12:38:354 GMT+05:30] 000000e2 SystemOut O *** ECDH ServerKeyExchange
[8/12/17 20:12:38:354 GMT+05:30] 000000e2 SystemOut O Signature Algorithm SHA256withRSA
[8/12/17 20:12:38:354 GMT+05:30] 000000e2 SystemOut O Server key: algorithm = EC
curve:
a: 11579123423421342342342314231489789230748230748273408234782394720394867097853948
b: 17236402134231740298346723968469234672346893462489213748732648213737264918234128
size: 256
generator:
[8927134698234629187463298746218937461392784632817496231984762394876239187462398746293847623984762319487623198476321948762319487623148792361489723164928137]
order:
12347698762381476675321746289134621384969234623746231421387468790945986723174868791
cofactor: 1
<<Logs truncated for security reasons>>>>> .
[8/12/17 20:12:38:354 GMT+05:30] 000000e2 SystemOut O *** ServerHelloDone


